 Pandali Folder Master for Outlook
Version 1.2
Help
Got Feedback On This Help File?
Let us know at our website.
Introduction
Pandali Folder Master for Outlook is a tool to help you move, copy, and delete folders in Outlook. It allows the user to select multiple Outlook folders at a time so that you can move folders in batches.
It also guides you through copying your folders from Outlook on one machine to another.
Quick Start
To move/copy some folders:
- Install Pandali Folder Master for Outlook from the Pandali website.
- Launch Folder Master by double-clicking the Folder Master icon on the Windows desktop or by launching Outlook and clicking the toolbar button. You need to restart Outlook after installation in order to see the Pandali Folder Master toolbar button.
- Click on folders in the folder list to select folders.
- Drag and drop the folders to the desired destination, holding down the Ctrl key if you wish to copy instead of move. Or click the Copy or Move buttons at the top of the Folder Master window.
The folders selected should now be moved/copied to the desired destination
To move/copy folders from one machine to another:
- Install Pandali Folder Master for Outlook from the Pandali website onto the machine you wish to copy folders from.
- Launch Folder Master by double-clicking the Folder Master icon on the Windows desktop or by launching Outlook and clicking the toolbar button. You need to restart Outlook after installation in order to see the Pandali Folder Master toolbar button.
- Click the "Transfer..." button at the top.
- Choose "Transfer To..." in the next dialog.
- Follow the instructions in the wizard.
- Install Pandali Folder Master on the destination machine, where you want to copy folders to.
- Launch it, and then click the "Transfer..." button at the top.
- Click "Transfer From..." and follow the instructions in the wizard.
More detailed help on transferring folders located here.
To move/copy mail folders between Outlook and Gmail (or other email services which use IMAP):
- Install Pandali Folder Master for Outlook from the Pandali website.
- Launch Folder Master by double-clicking the Folder Master icon on the Windows desktop or by launching Outlook and clicking the toolbar button. You need to restart Outlook after installation in order to see the Pandali Folder Master toolbar button.
- Click the "Transfer..." button at the top.
- Click the link for Gmail/IMAP at the bottom. Or go to http://pandali.com/pfm/help/gmail.html.
- Follow the instructions listed there.
Selecting Folders
There are several ways to choose the folders to work with:
- Clicking a folder will toggle the checkbox. If there are subfolders, these will also be checked or unchecked if the "Select Folders When Clicking" option is checked. This option appears on the right-hand side of the Folder Master window.
- Holding the Shift key while clicking will check/uncheck a range of folders starting from the previously-selected folder.
- The Check All and Uncheck All buttons at the right-hand side of the main Folder Master window will check/uncheck all folders.

Moving, Copying, and Deleting
Once you've selected some folders you can then drag-and-drop them to a destination folder, use one of the action buttons at the top of the Folder Master window, or right-click and choose an action.
Note that some folders are "Special Folders" and cannot be moved or deleted. These include the Inbox, Outbox, Calendar, Contacts, Tasks, etc. as well as the top-level folders. Deleting folders will move them into the Deleted Items folder
unless they are already inside the Deleted Items folder, in which case they will be permanently deleted.
If a folder and a descendant folder are checked but not some folders in between the two, the folder hierarchy will be collapsed, as shown below.

In the case of a move, the hierarchy of the remaining folders will also be collapsed if necessary.
After an action, you can click Undo to restore the previous state, unless some folders were permanently deleted. Note that there is one level of Undo,
so that if you perform two actions, only the last one can be undone.
Pandali Folder Master 1.2 includes a wizard to guide you through moving or copying folders from Outlook on one machine to Outlook on another machine.
There are also some instructions for transferring between Outlook and Gmail (or other IMAP email systems).
To transfer folders from Outlook on one machine to another, follow these steps:
- First, install Pandali Folder Master for Outlook from the Pandali website onto the machine you wish to copy folders from.
- Launch Folder Master by double-clicking the Folder Master icon on the Windows desktop or by launching Outlook and clicking the toolbar button. You need to restart Outlook after installation in order to see the Pandali Folder Master toolbar button.
- Click the "Transfer..." button at the top left.
- In the next dialog that opens, click "Transfer To..."
- The transfer wizard should appear. In Step 1, click the Create Temp PST... button to
create a Personal Folders (PST) file. If you have already used this wizard before, this PST file may already exist,
in which case it will be opened and any folders used before may still be present. You may wish to remove these old folders
from the temporary Personal Folders (PST) file first. You can use your own temporary Personal Folders (PST) file if you wish.
- Once created or opened the PST file should appear as an entry in the folder list of the main window of Pandali Folder Master, usually at the bottom. The wizard should proceed to step 2.
- In Step 2, go to the main Pandali Folder Master window and choose the folders which you wish to transfer to the other machine.
Simply check the boxes for the folders you wish to transfer. You can use Shift+Click to select a range of folders. Once done, click Next in the Transfer Wizard to proceed to step 3.
- In Step 3, click the Copy Folders... button. You can also use the Copy... button in the main Pandali Folder Master window.
If prompted to select a folder, choose the temporary Personal Folders entry as the destination folder. The default temporary Personal Folders file should have "PandaliTemp" in the name.
The wizard should then move to Step 4.
- In Step 4, copy the temporary PST folder created earlier to the destination machine.
You will probably need to close both Outlook and Pandali Folder Master before you can copy the PST file.
You can click the link to open up the instructions in Notepad. Then:
- Close the wizard, then close the main Pandali Folder Master window,
then Outlook if Outlook is already open.
- Copy the Personal Folders (PST) file to the destination machine.
You can use a USB drive, network, e-mail, CD-ROM, DVD-ROM, etc.
The default temporary PST file is called PandaliTemp.pst and is placed in the Documents folder.
- Install Pandali Folder Master for Outlook on the destination machine and launch it.
- There, click Transfer... then Transfer From..., and it will guide you through
bringing your folders onto the destination machine.
The temporary PST file will also be removed from Outlook when the transfer wizard is closed though the PST file itself will remain.
- On the destination machine, install Pandali Folder Master. You can again install it from the
Pandali website.
- Launch Pandali Folder Master and click the Transfer... button near the top.
- In the window that opens, click "Transfer From..." this time (the lower button).
- The transfer wizard should appear. Step 1 just informs you that you should have the temporary PST file from above available
from the destination machine. If it is on a read-only location such as a CD-R or DVD-R, you may need to copy it to
a folder on the destination machine itself. Click Next to proceed to Step 2
- In Step 2, click the Open PST... button and find the temporary PST file from above. The default temporary PST file
is called PandaliTemp.PST.
- In Step 3, go to the main Pandali Folder Master window and choose the folders inside the temporary Personal Folders entry which you wish to transfer to the this machine.
Check the boxes for the folders you wish to transfer. You can use Shift+Click to select a range of folders. Once done, click Next in the Transfer Wizard to proceed to step 4.
- In Step 4, click the Copy Folders... button. This should open up the Select Folder window to choose the destination folder. Choose the folder where you want to copy your folders.
Normally, this is the main Personal Folders entry, often the topmost item in the list. Click OK and your folders should be copied.
- That's it! You can check in the main Pandali Folder Master window to make sure the folders have been copied. Click OK to close the transfer wizard. This will also remove the temporary PST
from Outlook though the PST file itself will remain.
Other Buttons
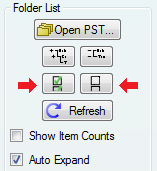
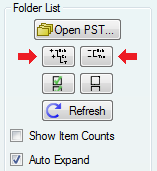
Expand All and Collapse All - these buttons will expand or collapse the entire folder hierarchy, either showing all the subfolders or only the very top level folders.

Refresh - will refresh the folder list from Outlook. Generally you should not need to do this as the folder list will be updated automatically.
Show Item Counts - if this option is checked, it will show the number of items in each folder if any. In addition, if there are unread items, the number of these will also be shown.
Auto Expand - if this option is checked, it will expand the subfolders of a folder if the checked/unchecked state of the subfolders is changing. This will normally have an effect only if the following option is also checked.
Check Subfolders When Clicking - if this option is checked, when you click on a folder that has subfolders, it will also check/uncheck the subfolders as well as expand them to be visible.
If checked, this results in default move/copy/delete behavior similar to Outlook or Windows explorer, where if you move a folder, the subfolders move along with it.
Enable Outlook Toolbar - this option controls whether the Folder Master for Outlook toolbar shows in Outlook or not. If you change this option, you may need to first shutdown
the Pandali Folder Master for Outlook and Microsoft Outlook before the option takes effect.
Help - access to Help, Feedback, Registration
Feedback - goes to the Contact section of the Pandali website so users can leave feedback about the product for Pandali.
Registration - displays information on the registration status for this installation. If you have purchased the product, you can enter your registration key here. It will also show the
number of days left in the free-trial period. More information can be found here.
Close - exits Pandali Folder Master. Note that if Folder Master was started from Outlook, closing the window actually just hides the window.
Support and Feedback
We'd love to hear your thoughts on our products. For support and feedback, go to our Contact Us page..
Other
Look for updates to this help file at Pandali Folder Master Help.
More information on Pandali Folder Master for Outlook can be found here.
Visit the Pandali website for more information on Pandali and our products.
 Pandali Folder Master for Outlook
 Pandali Folder Master for Outlook

